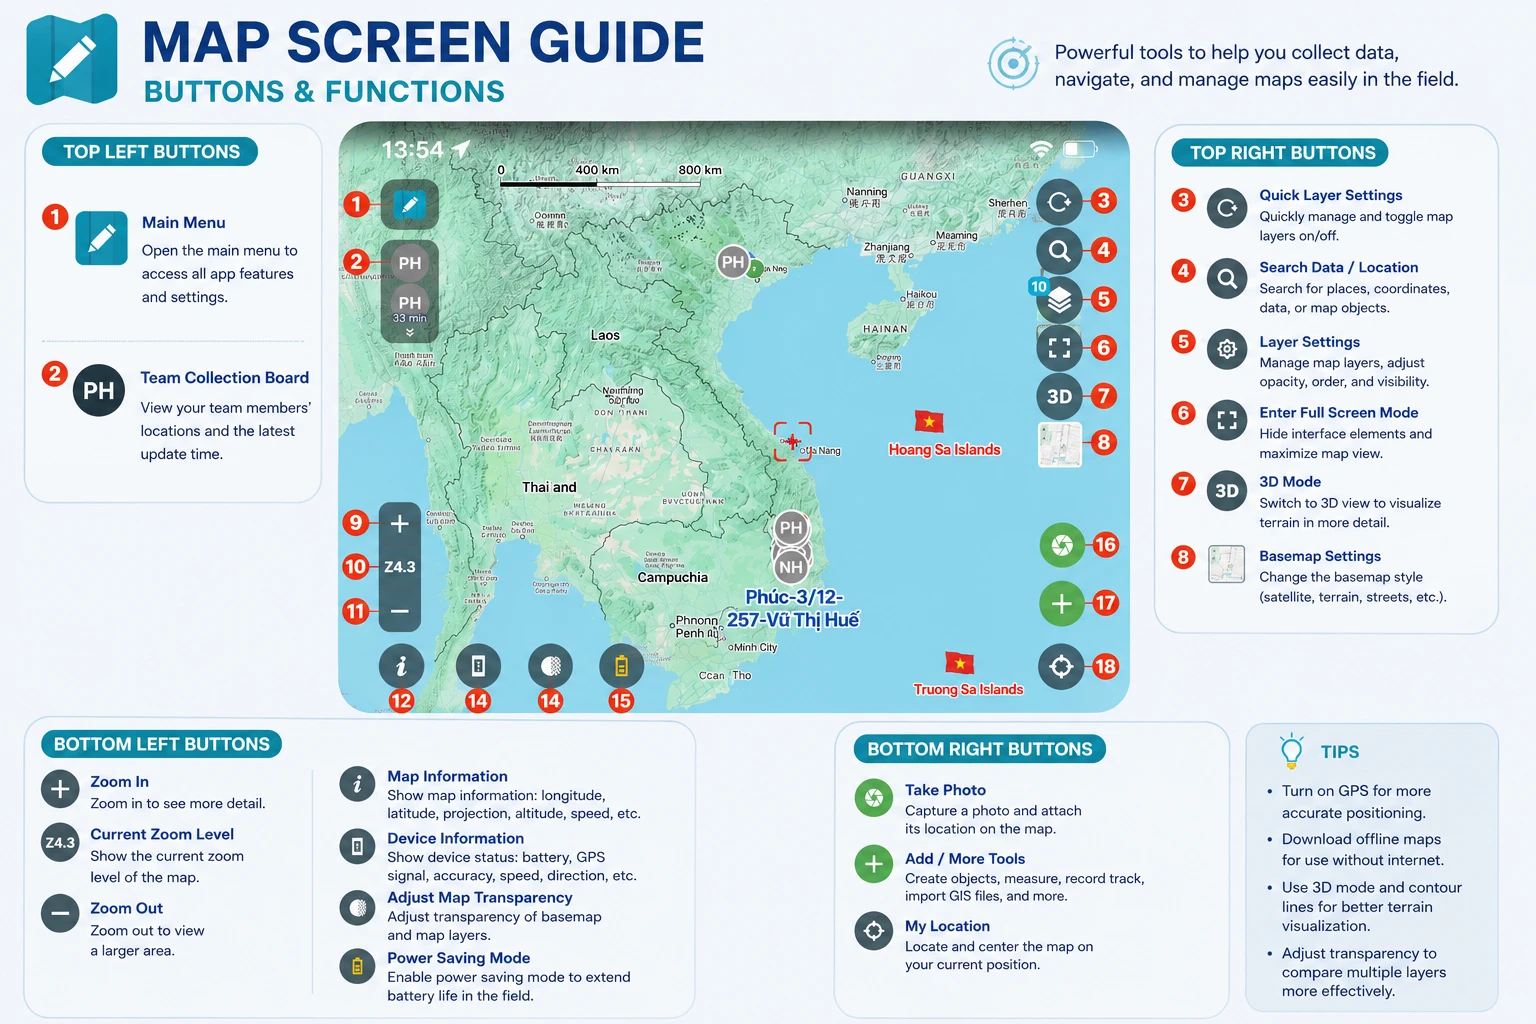
Map Screen – Buttons and Functions
The map screen is the main working area of the Geocollect app. Here users can view map data, collect field information, manage map layers, and use various other support tools.
Below is a detailed description of the button groups on the screen.
Top Left Buttons
1. Main Menu
Opens the main menu to access features such as:
- Collection forms
- Survey data
- Data sync
- Online data store
- Offline maps
- Tools
- Settings
- Notifications
- Support
2. Team Collection Panel
Displays a list of team members working in the field.
Users can:
- View current location of team members
- Track last GPS update time
- Support group collaboration
Top Right Buttons
3. Quick Map Layer Settings
Opens quick settings panel to quickly toggle data layers and customize map display.
Examples:
- Satellite imagery
- Terrain
- Contour lines
- Fire alerts
- Survey data layers
4. Search Data, Location…
Allows searching for:
- Coordinates
- Places
- Survey data
- Objects on the map
Users can quickly navigate to the location they want to view.
5. Map Layers Settings
Opens the list of map layers currently in use.
Here users can:
- Toggle layers
- Adjust transparency
- Manage display order
- Check data count for each layer
6. Fullscreen Mode
Hides excess interface components to expand map display space.
Suitable for:
- Observing maps
- Presentations
- Working on small screens
7. 3D Mode
Switches the map to 3D display mode.
When enabled, users can:
- Observe terrain more visually
- View terrain elevation
- Combine with contour line data
8. Basemap Settings
Changes the type of basemap displayed.
Examples:
- Google Satellite
- Google Hybrid
- Terrain
- Road map
- Dark/Light map
Bottom Left Buttons
9. Zoom In
Zooms in on the map to see more details.
10. Current Zoom Level
Displays the current zoom level of the map.
This value helps users know the level of data display on the screen.
11. Zoom Out
Zooms out to view a wider area.
12. Open Map Information
Displays information related to the map such as:
- Longitude
- Latitude
- Elevation
- Projection system
- Movement speed
13. Open Device Information
Displays device status in the field:
- Battery level
- GPS signal
- GPS accuracy
- Direction of movement
- Speed
14. Adjust Basemap and Map Layer Transparency
Allows changing transparency of:
- Basemap
- Satellite imagery
- Data layers
Helps easily compare and observe multiple data layers simultaneously.
15. Battery Saver
Toggle battery saver mode when working in the field.
This function helps:
- Reduce battery consumption
- Extend device usage time
- Suitable for long-duration surveys
Bottom Right Buttons
16. Take Photo
Take photos directly in the field and attach GPS location to the map.
Photos can be used for:
- Collecting current status
- Survey reports
- Field documentation
17. Plus Button
Opens a list of quick action functions such as:
- Create objects
- Measure
- Track GPS
- Import GIS files
- Collect data
This is the most important button when working in the field.
18. My Location
Identify and move the map to the user’s current location.
This function supports:
- Quick location
- GPS position tracking
- Return to current location on map quickly
Usage Tips
- GPS should be enabled for the app to determine location more accurately.
- When working in the field, offline maps should be downloaded in advance for use when network is lost.
- 3D mode and contour lines can be combined for more visual terrain observation.
- Use transparency adjustment to compare multiple data layers more effectively.